By Dory Cooper, School Programs Manager
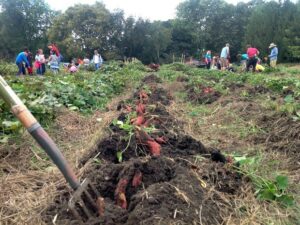
Sweet potatoes are an excellent plant to have growing in your school garden! In the Atlanta area they should be planted in May, before school ends for the summer, and then can be harvested in November. Once you plant your sweet potato slips you do not have to do ANYTHING other than water them. We have even seen many partner schools have a successful harvest by relying on rain water alone over the summer.
- No maintenance – sweet potato greens will vine out and cover your garden bed, which reduces the amounts that weeds grow. You do not need to cut them back or trim. The sweet potatoes will grow under the ground without any additional support or care.
- Both drought and food tolerant – this is perfect for a school garden that will be unattended over the summer. They should survive whether we have a rainy or dry summer!
- They look pretty – this plant makes a garden look like it is thriving with its beautiful purple flowers and luscious greens. The flowers resemble a morning glory and support the pollinators in your garden
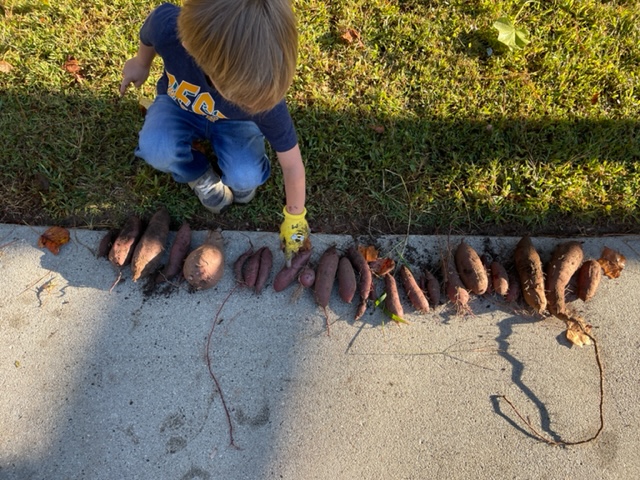
- Fun to harvest – your students will have a blast harvesting sweet potatoes in November! It requires all hands on deck, digging, pulling, and searching for the buried potatoes. This harvest time also lines up perfectly with November’s Harvest of the Month.
When to Plant: The best time to plant sweet potatoes in your garden is in May as you prepare to leave for the school year and your spring crops have been harvested.
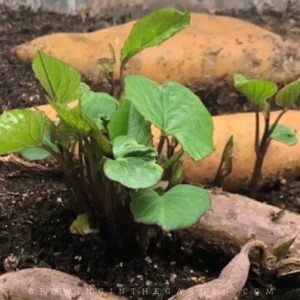
How to Plant: Sweet potatoes are grown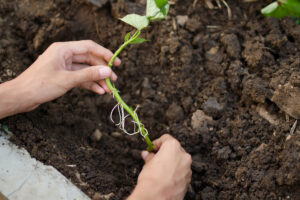 using slips not seeds. Sweet potato slips have been rooted from a sweet potato and can be planted like any other transplant. Dig a hole big enough to cover the root system of the sweet potato slip and cover about half of the stem. This will allow it to develop strong roots. Place sweet potato slips about 1 foot apart.
Sweet potatoes prefer loamy to sandy soil. A clay soil prevents the sweet potatoes from growing and will stunt the size and shape of the tubers. They prefer 8-10 hours of sunlight per day.
When to Harvest: October and November are the typical harvest times for sweet potatoes in the Atlanta area. The general rule of thumb is 90-120 days after planting. You will know it is time because the leaves will begin to turn yellow and die back.
How to Harvest: Cut back the leaves using shears or a weed wacker so you can easily access the garden bed. Dig using a pitchfork, shovel, or even your hands. Start at the root of the leaves and pull what you can. If you are lucky, you will pull up a bundle of sweet potatoes! It will likely break and then you will need to dig down in that area. Be careful not to stab the potatoes with the pitchfork and instead fold the soil up to reveal the potatoes. (It’s okay if you do poke it!) They can be buried 6-18 inches below the soil. You should find about 4-8 potatoes per sweet potato slip that was planted. Cure – by storing the potatoes for 1-3 weeks before eating, the tubers develop their flavors and starches are converted into sugars. This is what gives sweet potatoes their sweetness and flavor. You can store them in the classroom in a cabinet or dark space, not the refrigerator.
Where to find Sweet Potato Slips: Sweet Potato slips can be purchased from most seed companies. At Wylde Center, we use George’s Plant Farm. This year they cost $15 for 12 slips and are delivered just in time to plant.
You can also grow your own in the classroom!
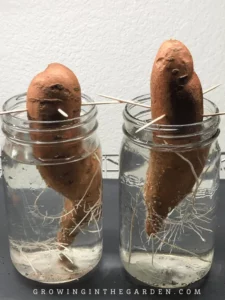 Water Method (8-12 weeks)
- Choose a healthy, organic sweet potato
- Suspend half of the potato in a jar of water using toothpicks.
- Place in a sunny window
- You will see roots begin to grow in the water and eventually green sprouts out of the tops and sides.
- Replace the water regularly to ensure the jar stays full.
- Once the sprouts are 4-6 inches tall, use scissors to cut them at their base.
- Place sprouts in a new jar with water for 5-7 days until roots grow.
 Soil Method (4-6 Weeks)
- Choose a healthy, organic sweet potato
- Nestle the potato into a foil pan filled with soil.
- Keep the soil damp, but not wet.
- Place in a sunny window or provide warmth with a heating pad.
- Green sprouts will start to grow out of the potato
- Replace the water regularly to ensure the jar stays full.
- Once the sprouts are 4-6 inches tall, use scissors to cut them at their base.
- Place sprouts in a new jar with water for 5-7 days until roots grow.