Thank you for purchasing a Shiitake Mushroom Log from Wylde Center!
Here's how to best care for your log. Remember: Patience is key. It can take 6-12 months (in rare cases even longer) for the "spawn run" to complete. This is the period during which the fungal mycelium colonizes the wood in your freshly-inoculated log. Once this process finishes and conditions are right, you will get your first harvest of mushrooms. The good news after all that waiting is that, once your log starts fruiting, you can expect 3-5 flushes per year for a few years without much special care. Exactly how often and how long your log produces mushrooms depends greatly on its size and specific growing conditions.
Step 1, Place: Find a consistently shady and wind-sheltered spot outside to store your log. It should never get direct sunlight and ideally it would be able to receive natural rainfall. They can be leaned against a tree or simply placed on the ground, but in order to reduce chances of contamination, we recommend placing a brick or similar under the log for the first few months.
Step 2, Water: Thoroughly water your log once a week during periods of no rainfall. Continue this routine for 3-4 months, then you may reduce watering to every other week. After 6 months, place your log directly on the ground so that it can wick moisture from the soil. You can even bury one end a couple of inches below the surface. At this point you should not have to water except during extended periods of little to no rainfall.
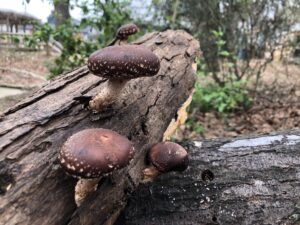
Step 3, Harvest: Depending on specific conditions, you can expect your first flush of mushrooms in 6-12 months. This will happen after warm, wet periods when temperatures drop to 55-70F. You may harvest the mushrooms at any stage of emergence, but just after the gills are exposed is the ideal time. You can harvest a few at a time over the course of a week or so, or all at once and store in a paper bag in the fridge. If you get more than you can manage with those storage techniques, consider dehydration.
Step 4, Force or Don't: At this point, you can take one of two approaches, or a combination of the two:
Force Fruiting: Only after your log has fruited for the first time, you can "force fruit" by soaking your log in cold, non-chlorinated water for 12 hours (never more than 24). After soaking, return to its home and water daily until it fruits, typically within a week. Allow the log to rest for at least 2 months before force fruiting again.
Natural Fruiting: Leave your log alone and let it fruit when it wants! Just be sure to check on it during/after wet periods so you don't miss a delicious harvest.
Step 5, Enjoy for Years to Come: Continue enjoying your home-grown shiitakes until the log eventually decomposes after a few years of production.
Other things to keep in mind:
- If you notice missing plugs where the logs were inoculated, it is probably wildlife eating them. If this happens in the first 6 months, you will want to protect them by wrapping with screen, hardware cloth, or similar. If after six months, there's no need to worry because the mycelium should have spread into the wood by then.
- You can safely surface water your logs with tap water, but soaking should be done with non-chlorinated water. If using tap water for soaking, just let it sit for at least 24 hours before submerging your log to allow the chlorine to evaporate.
- Freezing temperatures usually aren't cause for concern, but if they come along in the first 3-ish months of your log's life, we recommend covering with a tarp or similar to be extra safe.
Questions? Contact Wylde Center's Greenspace Director, Derek Pinson, at Derek@wyldecenter.org or check out this excellent webpage from our favorite supplier, Mushroom Mountain: https://mushroommountain.com/growing-shiitake-on-logs/
If you're inspired to make your own logs, check out Mushroom Mountain and Field & Forest Products. Wylde Center may also offer log-making workshops in the future, so watch for announcements!
How it's made!
Check out this video and photos of Wylde Center's Greenspace Team and Apprentices making your logs! The process is simple, but labor-intensive. First, holes are drilled all over your log using a special drill bit. Then the holes are filled with 'sawdust spawn', sawdust that contains fungal mycelium, using a special inoculation tool. Then the filled holes are sealed with wax to retain moisture and protect the spawn until it is able to begin colonizing the surrounding wood. Cool, eh?


